Sunday, May 02, 2010
I've moved!!
I don't really know who still comes to this blog address, but I've migrated to Wordpress (a while back). Come check me out at my new address.
Wednesday, September 16, 2009
Garlicky Shrimp Pasta & "House" Salad w/ Semi-Homemade Creamy Sesame Dressing
After making the Cook's Illustrated Chicken last night...i decided to find another recipe from that site to make for tonight!...We decided on Garlicky Shrimp Pasta...sounded really tasty!!!...tasted really tasty!!! :) For our veggies...we went the salad route and steven wanted a japanese-style creamy dressing...so I created one!!

Garlicky Shrimp Pasta
Ingredients
1 Bulb of Garlic, mince 1/2 of the cloves, and smash 1/2 of the cloves
1 Pound shrimp, peeled, deveined, each shrimp cut into 3 pieces
3 Tbsp Garlic Flavored Olive Oil
1 tsp Salt
1 Pound Penne
1/4 tsp Red Pepper Flakes
2 tsps All-Purpose Flour
1/2 cup Dry Sherry
3/4 cup Chicken Broth
1 Tbsp Dried Parsley Flakes
3 1/2 Tbsps Unsalted Butter
2 tsp Lemon Juice
1 tsp Black Pepper
Instructions
1. Toss 1/2 of the minced garlic, shrimp, 1 tablespoon oil, and 1/4 teaspoon salt in medium bowl. Let shrimp marinate at room temperature 20 minutes.
2. Heat the smashed garlic cloves and remaining 2 tablespoons oil in a dutch oven over medium-low heat, stirring occasionally, until garlic is light golden brown, 4 to 7 minutes. Remove from heat and use slotted spoon to remove garlic from dutch oven; discard garlic.
3. Bring 4 quarts water to boil in large pot over high heat. Add 1 tablespoon salt and pasta. Cook until just al dente, then drain pasta, reserving 1/4 cup cooking water.
4. While pasta cooks, return dutch oven with oil to medium heat; add shrimp with marinade to dutch oven in single layer. Cook shrimp, undisturbed, until oil starts to bubble gently, 1 to 2 minutes. Stir shrimp and continue to cook until almost cooked through, about 1 minute longer. Using slotted spoon, transfer shrimp to medium bowl. Add remaining 3 teaspoons minced garlic and pepper flakes to skillet and cook until fragrant, about 1 minute. Add flour and cook, stirring constantly, for 1 minute; stir in sherry and cook for 1 minute. Add chicken broth and parsley; cook until mixture starts to thicken, 1 to 2 minutes. Off heat, whisk in butter and lemon juice. Add shrimp and pasta to sauce and combine, adding reserved cooking water if sauce is too thick. Season with salt and black pepper.

Semi-Homemade Creamy Sesame Dressing
Ingredients
2 Tbsp Canola Mayonnaise
2 Tbsp Japanese Sesame Dressing
1 Tbsp Sugar
Instructions
1. Mix well!
Tuesday, September 15, 2009
Stovetop Roast Chicken with Lemon-Garlic-Herb Sauce & Pepper Garlic Broccoli
Steven's mommy defrosted some chicken thighs yesterday but didn't cook it so I cooked with it tonight!
I searched for easy recipes to use the chicken thighs with and I came across Cook's Illustrated's Stovetop Roast Chicken with Lemon-Herb Sauce. We used the chicken thighs in place of the "chicken parts." And we didn't have shallots, so I had to alter the sauce a bit.

Stovetop Roast Chicken with Lemon-Garlic-Herb Sauce
1 Tbsp Vegetable Oil
11 Skin-on, Bone-in Chicken Thighs
2 tsp Salt
1 tsp Black Pepper
1 14 oz can Low-Sodium Chicken Broth
1 tsp Vegetable Oil
3 Tbsp Chopped Garlic
1 tsp All-Purpose Flour
2 tsp Dried Parsley Flakes
2 tsp Dried Chives
1 Tbsp Lemon Juice
1 Tbsp Cold Butter
1. FOR THE CHICKEN: Pat chicken dry and season with salt and pepper. Heat 2 teaspoons oil in 12-inch nonstick skillet over medium-high heat until shimmering. Add chicken pieces skin-side down and cook without moving until golden brown, 5 to 8 minutes.
2. Using tongs, flip chicken pieces skin-side up. Reduce heat to medium-low, add 1 cup broth to skillet, cover, and cook until instant-read thermometer inserted into thickest part of chicken registers 155 degrees for breasts and 170 degrees for legs and thighs, 10 to 16 minutes (smaller pieces may cook faster than larger pieces). Transfer chicken to plate, skin-side up.
3. Pour off liquid from skillet into 2-cup measuring cup and reserve. Using tongs, wipe skillet with paper towels. Add remaining teaspoon oil to skillet and heat over medium-high heat until oil is shimmering. Return chicken pieces skin-side down and cook undisturbed until skin is deep golden brown and crisp and it reaches 160 degrees for breasts and 175 degrees for legs and thighs, 4 to 7 minutes. Transfer to serving platter and tent loosely with foil. Using spoon, skim fat from reserved cooking liquid and add rest of the broth.
4. FOR THE SAUCE: Heat oil in now-empty skillet over low heat. Add garlic and cook, stirring frequently, until softened, about 1 minute. Add flour and cook, stirring constantly, 30 seconds. Add parsley flakes and chives, mix well. Increase heat to medium-high, add reserved cooking liquid, and bring to simmer, scraping skillet bottom with wooden spoon to loosen browned bits. Simmer rapidly until reduced to 1/2 cup, 2 to 3 minutes. Stir in any accumulated juices from resting chicken; return to simmer and cook 30 seconds. Off heat, whisk in lemon juice and butter; season with salt and pepper. Pour sauce around chicken and serve immediately.
Pepper Garlic Broccoli
1 Tbsp Vegetable Oil
1 Tbsp Chopped Garlic
1 14 oz can Low-Sodium Chicken Broth
4 Crowns Broccoli
2 tsp Salt
1 tsp Black Pepper
Sprinkle of Red Pepper Flakes
1 tsp All-Purpose Flour
1 Tbsp Butter
1. In a 12-inch skillet, heat vegetable oil to a simmer on medium-high heat. Add chopped garlic and heat for 1 minute.
2. Add chicken broth and heat until simmering.
3. Add brocolli, salt, black pepper, and red pepper flakes.
4. Cover and cook for 8 minutes, stirring occasionally.
5. Transfer broccoli to a plate with a slotted spoon, leaving the liquid in the skillet.
6. In a small bowl, mix flour with a little water. Add flour mixture to broth in skillet, stirring quickly.
7. Turn off heat when broth reaches the desired thickness. Add butter and stir until melted.
8. Pour sauce on the broccoli and serve hot.
Friday, May 29, 2009
Bread Bread Buns Buns...
BBQ Pork Buns (May 27, 2009)
I was given a recipe to make some BBQ Pork Baked Buns earlier this week. My friend wanted to know if it comes out like the ones at the Chinese Bakery...the answer is...no...NSM (Not So Much)...
Unfortunately, I cannot share the recipe on here because it is a "secret" recipe. But trust me, you're not missing out~~

Pork Sung (Floss) Buns (May 28, 2009)
I was browsing the blog "The Viewfinder of Mr and Mrs Kwok" and came across a recipe for Pork Sung Buns. I tried using the recipe, but kind of failed. Not really sure what I did wrong. The dough (as prepared per Mrs. Kwok's recipe) was really wet, and could not be "shaped." Therefore, I added enough flour to make it "shapable." I probably added WAY too much flour, because when the buns came out of the oven, they were a bit rock-like. I picked one up and threw it on the cookie sheet, and all it did was bounce, nothing happened to the bun, not a crack nor a dent. So, needless to say, they went straight to the trash.
Pork Sung (Floss) Buns & Hot Dog Buns (May 29, 2009)
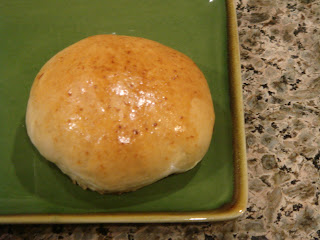
Because of the failure of yesterday's Pork Sung Buns, I've decided to find another recipe (after all, I bought a tub of the Pork Sung). I found the Honey Buns recipe for the Happy Home Baking blog. I decided to transform these Honey Buns to Pork Sung Buns and Hot Dog Buns. I simply followed the recipe as is, except I separated the dough into 10 and not 9. Also, for the Hot Dog Buns, I used a mini rolling pin and rolled the dough into a longish-rectangular shape. Placed the Hot Dog at one end, and rolled it up. I let the Pork Sung Buns proof the same way as the Honey Buns, but the Hot Dog buns proofed with the hot dog rolled in it. After proofing,and brushing the tops with milk, I baked them at 375 degrees F for 12 minutes. After the honey buns were done, I simply brushed some transparent mayonnaise and topped with with Pork Sung. Here's my finished product:

 We felt that the bun to hot dog ratio was a bit low (ie: not enough bun for the size of the hot dog). So it was a bit on the salty side. Next time, I will use a bigger piece of dough for the hot dog. I haven't tried these buns overnight yet, but touching it, it still feels soft. I will provide an update later.
Milky Loaf (May 29, 2009)
Aside from the buns, I also baked a Milky Loaf. Also, I haven't sliced this and tried it yet. I will also try and provide an update of the loaf later. I think it's a little bit on the darker end, so I will make sure to either cover it with foil, or place the rack lower.

I was given a recipe to make some BBQ Pork Baked Buns earlier this week. My friend wanted to know if it comes out like the ones at the Chinese Bakery...the answer is...no...NSM (Not So Much)...
Unfortunately, I cannot share the recipe on here because it is a "secret" recipe. But trust me, you're not missing out~~


Pork Sung (Floss) Buns (May 28, 2009)
I was browsing the blog "The Viewfinder of Mr and Mrs Kwok" and came across a recipe for Pork Sung Buns. I tried using the recipe, but kind of failed. Not really sure what I did wrong. The dough (as prepared per Mrs. Kwok's recipe) was really wet, and could not be "shaped." Therefore, I added enough flour to make it "shapable." I probably added WAY too much flour, because when the buns came out of the oven, they were a bit rock-like. I picked one up and threw it on the cookie sheet, and all it did was bounce, nothing happened to the bun, not a crack nor a dent. So, needless to say, they went straight to the trash.
Pork Sung (Floss) Buns & Hot Dog Buns (May 29, 2009)
Because of the failure of yesterday's Pork Sung Buns, I've decided to find another recipe (after all, I bought a tub of the Pork Sung). I found the Honey Buns recipe for the Happy Home Baking blog. I decided to transform these Honey Buns to Pork Sung Buns and Hot Dog Buns. I simply followed the recipe as is, except I separated the dough into 10 and not 9. Also, for the Hot Dog Buns, I used a mini rolling pin and rolled the dough into a longish-rectangular shape. Placed the Hot Dog at one end, and rolled it up. I let the Pork Sung Buns proof the same way as the Honey Buns, but the Hot Dog buns proofed with the hot dog rolled in it. After proofing,and brushing the tops with milk, I baked them at 375 degrees F for 12 minutes. After the honey buns were done, I simply brushed some transparent mayonnaise and topped with with Pork Sung. Here's my finished product:

 We felt that the bun to hot dog ratio was a bit low (ie: not enough bun for the size of the hot dog). So it was a bit on the salty side. Next time, I will use a bigger piece of dough for the hot dog. I haven't tried these buns overnight yet, but touching it, it still feels soft. I will provide an update later.
Milky Loaf (May 29, 2009)
Aside from the buns, I also baked a Milky Loaf. Also, I haven't sliced this and tried it yet. I will also try and provide an update of the loaf later. I think it's a little bit on the darker end, so I will make sure to either cover it with foil, or place the rack lower.

Wednesday, May 27, 2009
椰汁馬豆糕 (Coconut Split Pea Jello) vs. 花奶綠豆滑 (Milky Mung Bean Jello-y Pudding)
Elaine sent me a message yesterday asking me if I know how to make "horse bean jello." I've never made it before, but I found her a recipe. It was a hot day yesterday, so I went ahead and made some (using another recipe). I didn't have any coconut milk or any yellow split peas, so i replaced the coconut milk with additional evaporated milk, and the yellow split peas with shelled mung beans. I'm not sure if it's because the the coconut milk replacement or the split peas replacement, but the "jello" didn't set. It set a little bit, but it's more like pudding. It's not all pudding though, it's somewhat dense and it requires some kind of chewing (not melt-in-your-mouth).
 But it's supposed to look like this...

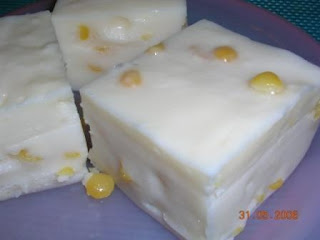 (Copyright: http://fat_family.mysinablog.com)
Ingredients:
100g Yellow Split Peas (replaced w/ 200g Mung Beans...I LOVE Mung Beans)
160g Evaporated Milk
280g Sugar
400g Coconut Milk (replaced w/ 400g of Evaporated Milk)
170g Corn Starch
5 Cups Water
Directions:
1. Clean yellow split peas. Place clean split peas in small saucepan, cover with water. Boil until split peas are tender. Drain & set aside.
2. Combine corn starch, evaporated milk and coconut milk.
3. Bring the 5 cups of water to a boil, dissolve sugar in boiling water. Add corn starch mixture to sugar water, stirring constantly. Bring to a boil.
4. Add split peas, mix well.
5. Pour mixture into a lasagna pan and let cool. Once cooled, place in refrigerator to cool completely.
 But it's supposed to look like this...
 (Copyright: http://fat_family.mysinablog.com)
100g Yellow Split Peas (replaced w/ 200g Mung Beans...I LOVE Mung Beans)
160g Evaporated Milk
280g Sugar
400g Coconut Milk (replaced w/ 400g of Evaporated Milk)
170g Corn Starch
5 Cups Water
Directions:
1. Clean yellow split peas. Place clean split peas in small saucepan, cover with water. Boil until split peas are tender. Drain & set aside.
2. Combine corn starch, evaporated milk and coconut milk.
3. Bring the 5 cups of water to a boil, dissolve sugar in boiling water. Add corn starch mixture to sugar water, stirring constantly. Bring to a boil.
4. Add split peas, mix well.
5. Pour mixture into a lasagna pan and let cool. Once cooled, place in refrigerator to cool completely.
Tuesday, May 26, 2009
Personal-Sized Fruit Tarts

Had lots of fruits leftover from various treat-making, so I decided to make some fruit tarts.
Ingredients:
1 Cup Butter
1 Cup Confectioner's Sugar
1 Egg
3 Cups All-Purpose Flour
1 tsp Vanilla Extract
1 Cup Milk Chocolate Chips
2 Cups Heavy Whipping Cream
1/2 Cup Confectioner's Sugar
Various Fruits, diced (if necessary)
Directions:
1. Preheat oven to 300 degrees F.
2. In a large bowl, cream butter and confectioner's sugar until smooth.
3. Add egg, mix well.
4. Add flour, 1 cup at a time, mixing well after each addition.
5. Add vanilla extract. Mix well.
6. Separate dough into 24 equal pieces and mold to the shape of tart molds.
7. Bake in preheated oven for 25-30 minutes, until golden brown. Let cool.
8. In a separate large bowl, whip heavy whipping cream until it thickens.
9. Add sugar and whip until soft peaks are formed.
10. Melt chocolate chips in microwave-safe bowl until melted.
11. Spread chocolate evenly into each tart.
12. Fill desired amount of whipped cream into each tart.
13. Top with favorite fruits.
14. ENJOY!

Monday, May 25, 2009
Matcha Green Tea Daifuku & Chocolate Strawberry Daifuku

Mochi Mochi Mochi~~~
We were supposed to meet up with Miss Ma today, so I made some Mochis for her last night.

Matcha Green Tea Daifukus
 and Chocolate Strawberry Daifukus
Matcha Green Tea Daifukus
 Ingredients:
1 Cup Glutinous Rice Flour
1/4 Cup Sugar
1/2 tsp Matcha Green Tea Powder
2/3 Cup Water
1 Cup Course Red Bean Paste
2 Tbsp Potato/Corn Starch (for dusting)
Directions:
1. Mix Glutinous Rice Flour, Sugar, Matcha Green Tea Powder, and water together until smooth.
2. Pour in microwave safe bowl sprayed with non-stick cooking spray. Cover with wet paper towel. Microwave on high for 2 minutes.
3. Let cool until cool enough to handle.
4. While Mochi mixture cools, separate the red bean paste into 12 equal parts. Roll each part into a ball.
5. Take a 1-inch piece and flatten, using potato/corn starch to dust hands. Wrap a red bean paste ball into flattened mochi piece. Form into a ball. Set aside and continue with the next Mochi.
Chocolate Strawberry Daifukus
 Ingredients:
1 Cup Glutinous Rice Flour
1/4 Cup Sugar
1 tsp Cocoa Powder
2/3 Cup Water
1/2 Cup Strawberries, diced
1/2 Cup Semi-Sweet Chocolate Chips
1 Tbsp Potato/Corn Starch (for dusting)
Directions:
1. Mix Glutinous Rice Flour, Sugar, 1/2 tsp Cocoa Powder, and water together until smooth.
2. Pour in microwave safe bowl sprayed with non-stick cooking spray. Cover with wet paper towel. Microwave on high for 2 minutes.
3. Let cool until cool enough to handle.
4. When Mochi is almost cooled, melt chocolate chips in a microwave safe bowl in microwave. Mix with strawberries.
5. Mix 1/2 tsp Cocoa Powder and potato/corn starch. Take a 1-inch piece and flatten, using cocoa powder and potato/corn start to dust hands. Wrap 2-3 pieces of chocolate covered strawberries into flattened mochi piece. Form into a ball. Set aside and continue with the next Mochi.
馬拉糕 (Malaysian Style Steamed Sponge Cake) - Trial Two

Steven has been asking me to make the 馬拉糕 for a while now. I felt that the one last time was a little bit dense, so I changed from All-Purpose Flour to Cake Flour (the original recipe just stated "Flour"), separated the egg whites from the egg yolks and whipped the whites first. It is MUCH fluffier!!! I like it much more this time!!

Ingredients:
240g Cake Flour
60g Custard Powder
2 tsp Baking Powder
1/2 tsp Baking Soda
6 Egg Whites
6 Egg Yolks
360g Brown Sugar
1/2 tsp Vanilla Extract
160g Butter, Melted
Directions:
1. Sift together flour, custard powder, baking powder and baking soda, twice.
2. Whisk egg whites in large bowl until soft peaks are formed. Gradually add in brown sugar and whisk until stiff. Fold in Egg Yolks.
3. Add flour mixture 1/3 at a time, mix well after each addition. .
4. Fold butter and vanilla extract into batter, quickly. .
5. Grease and sugar-coat 9" Springform Pan, and pour in batter.
6. Steam on high heat for 50 minutes, until cooked.
Friday, May 22, 2009
Starry Starry Scones...Again...
I brought all the Starry Starry Scones that I baked on Tuesday to work on Wednesday. Steven wasn't too happy about it, so I made more last night: Two batches of Vanilla Bean Scones (his favorite), one batch of Chocolate Chip Scones (my favorite), and one batch of Snickerdoodle Scones (my new favorite!).
I made the new addition to this family by adding 2-3 tsps cinnamon to the Vanilla Bean Scones dough, and topping it with cinnamon sugar. The cinnamon sugar is roughly 1 part cinnamon to 3-4 parts sugar. These Snickerdoodle Scones are so awesome!! Next time, I think I'm going to top it was some raw sugar for a CRUNCH!!!

I made the new addition to this family by adding 2-3 tsps cinnamon to the Vanilla Bean Scones dough, and topping it with cinnamon sugar. The cinnamon sugar is roughly 1 part cinnamon to 3-4 parts sugar. These Snickerdoodle Scones are so awesome!! Next time, I think I'm going to top it was some raw sugar for a CRUNCH!!!

Thursday, May 21, 2009
Starry Starry Scones
Been browsing allrecipes.com at work lately, and I really want to try making each of the top 20 recipes on the website. One thing that I've been wanting to make for a while now is Grandma Johnson's Scones. The recipe has AWESOME reviews, and is easily customizable to create your own version of the perfect scone. I've read that some people split the dough into two and create two different flavors. I decided to go this route, and I went with Chocolate Chip Scones, and Vanilla Bean Scones.
Going to UCD, I would always check the UCDavis Coffee House for their Chocolate Chip Scones. They're always so moist and delicious. After graduating and moving away from Davis, I don't really have access to those scones anymore. So when I found out how easily this recipe can be customized, I HAD to make half as Chocolate Chip Scones.
The reason for Vanilla Bean Scones is because Steven & I absolutely LOVE the Petite Vanilla Scones that are at Starbucks. They are soooo yummy!!! However, a tad expensive. So I decided to create my own version at home, and Steven (and some coworkers) think that these are just like the Starbucks ones. :)
I basically followed the recipe as is, but I added vanilla bean to the whole dough, chocolate chips into the Chocolate Chip Scone, and a vanilla bean glaze on top of the vanilla bean scone. Also, instead of cutting the dough into wedges, I used a (roughly 2 inch) star cookie cutter and baked for 18 minutes.

Prepare dough based on the recipe. Add 1/2 vanilla bean into dough, mix well. Split dough into two equal sections. Mix desired amount (I mixed in roughly 1/2 cup to 3/4 cup) of semisweet chocolate chips into one section of the dough. Roll/pat down each section of the dough to 1/2 inch to 3/4 inch thickness. Cut into wedges or use cookie cutters (roughly 2 inches wide) to cut shapes out. Bake in oven for 18 minutes. Makes around palm-sized scones.
While vanilla scones are baking, prepare the vanilla bean glaze. Sift 1/2 cup confectioner's sugar in mixing bowl. Add 1 Tbsp milk, and the other 1/2 of the vanilla bean. Mix well. Spread over Vanilla Bean Scones when scones are semi-cooled.
Serve with your favorite coffee. :)
Wednesday, May 20, 2009
Barbecue Baby Back Ribs
I was browsing through the 通之廚房 blog and came across a Spare Ribs in Barbecue Sauce recipe. Steven loves ribs, so I decided to try this recipe out. This was part of our 05.19.09 dinner. We served it as a Chinese dish, with a plate of Stir-Fried Peppers and Chicken and a plate of veggies. The meat was really tender, but we felt that the sauce was too sour/tart. We then added two Tbsp sugar, but still sour/tart. We then proceeded to adding 1/4 cup of honey, but it was still sour/tart. Not really sure how to describe it, but we felt that it would ruin the ribs is we coated the ribs in it, so we used it as a dipping sauce instead. I think it turned out good, but not really good enough. I guess I have to be fair and admit that I didn't use the "original barbecue sauce" stated in the recipe. I used what I had -- Cattlemen's Smoky BBQ Sauce. I think I would be willing to give this another try, but the sauce definitely needs improvement.

Barbecue Baby Back Ribs

Stir-Fried Peppers and Chicken

Barbecue Baby Back Ribs

Stir-Fried Peppers and Chicken
Friday, May 15, 2009
咖喱角 (Curry Beef Empanadas)
I was getting my spongecake recipe from the Maria Lee website and came across this recipe for 咖喱角 (Curry Beef Empanadas). I made the filling and it tasted ok...but after it was baked in the pastry...it became REALLY salty...not sure why...but we'll hafta add less salt next time...and I might add potatoes next time...:)
Overall...trial one was ok...steven didn't like it...and will not eat another one...the dad didn't comment on it...and the mom thought the filling was dry...:(


Overall...trial one was ok...steven didn't like it...and will not eat another one...the dad didn't comment on it...and the mom thought the filling was dry...:(


Wednesday, May 13, 2009
梳乎厘 (Souffle)
I decided to bake a Souffle for the first time today...it turned out okay...Steven didn't think it was sweet enough...I think I'm gonna make some creme anglaise for it next time...or just change the recipe as a whole...
I followed this simple chinese recipe...


I followed this simple chinese recipe...


Tuesday, May 12, 2009
Daifuku (AKA Mochi)
Our friend Nancy posted a picture of her tray of Strawberry Mochis...
 (Nancy Tao Copyright)...
I tried asking her for the recipe...but she refused!!!...so I had to find my own recipe and experiment with it...
I found this recipe online...
I guess it turned out ok...I haven't really mastered how to make them round...so I will have to do more research...but I was pretty impressed with trial one...


Sunday, May 10, 2009
Steamed "Malaysia" Sponge Cake 馬拉糕
Went to Alley's today to show them how to make the HK Style Egg Custard Tart. Alley's mommy has lots and lots of cookbooks!!! I borrowed one with recipes for dim sum. I decided to make Steamed "Malaysia" Sponge Cake (馬拉糕) for uncle cuz he loves that stuff!!!
Steamed "Malaysia" Sponge Cake (馬拉糕)
Ingredients:
240g flour
60g custard powder
2 tsp baking powder
1/2 tsp baking soda
6 eggs
360 brown sugar
1/2 tsp vanilla extract
160g butter, melted
Instructions:
1. Sift flour, custard powder, baking powder, and baking soda together twice.
2. Whisk eggs. Sift brown sugar in gradually, whisk until creamy.
3. Fold in flour mixture, 1/3 at a time. Let sit for 30 minutes.
4. Mix in vanilla extract and melted butter. Let sit for 10 minutes.
5. Pour mixture in a greased and sugar coated 9 inch springform pan.
6. Steam on high heat for 50 minutes, until cooked.
Tip: Make sure there is plenty of water when steaming because water shouldn't be added halfway. If the cover is taken off, the cake will not rise properly.


Subscribe to:
Posts (Atom)
